

- Google Cloud KMS
- AWS KMS
How It Works
- You create a signing key inside Google Cloud KMS — the private key never leaves Google’s hardware.
- A Cloud Run function sits in front of KMS and signs transaction digests on demand.
- The Crossmint SDK calls your Cloud Run function whenever the wallet needs to sign something.
- The signature is converted from Google’s format to Ethereum’s format, and the Crossmint SDK uses it to complete the transaction.
What You Will Build
- An asymmetric signing key in Google Cloud KMS (secp256k1)
- A Cloud Run function that signs digests via KMS
- A Crossmint server wallet using your KMS key as its signer
Prerequisites
- A Google Cloud project with billing enabled
- A Crossmint server API key
- Node.js 18+
Set Up Google Cloud KMS
Enable the Cloud KMS API
Create a Key Ring
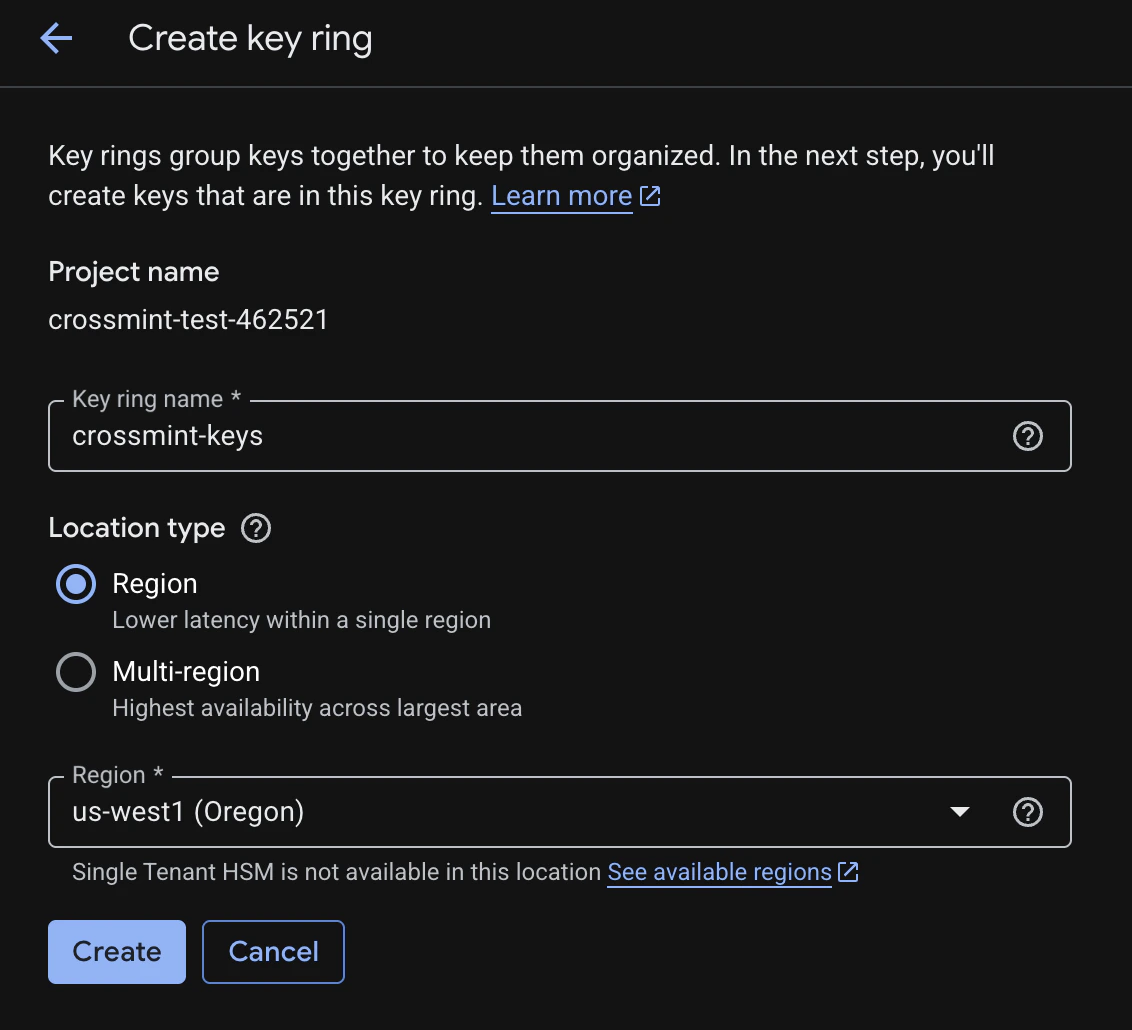
- Key ring name:
crossmint-keys(or your preferred name) - Location: Select a region, e.g.
us-west1
Create an Asymmetric Signing Key
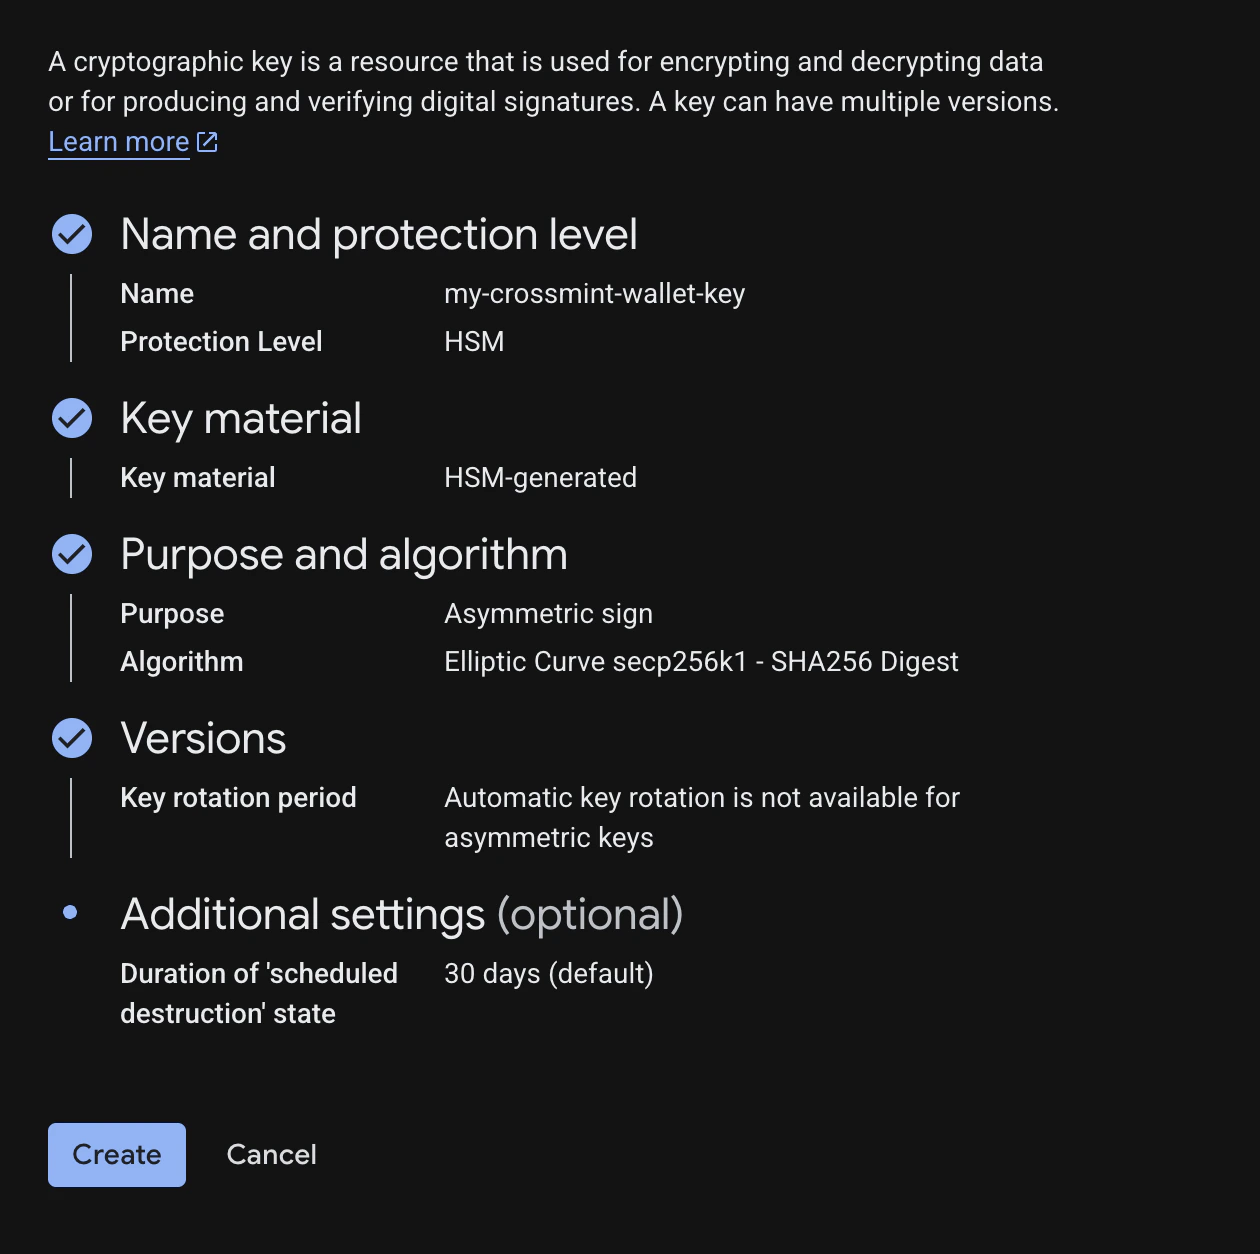
| Setting | Value |
|---|---|
| Key name | my-crossmint-wallet-key |
| Protection level | HSM (Hardware Security Module) |
| Key material | HSM-generated key |
| Purpose | Asymmetric Sign |
| Algorithm | Elliptic Curve secp256k1 - SHA256 Digest |
secp256k1 curve for EVM-compatible wallets. Other curves (e.g. P-256) will not produce valid Ethereum signatures.Download the Public Key
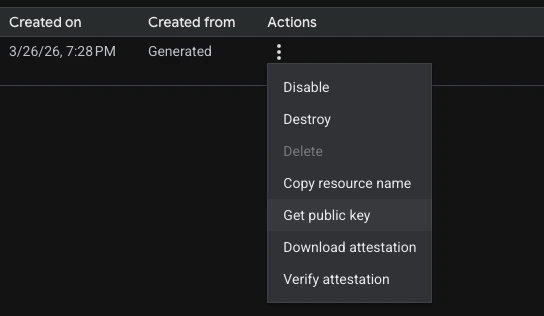
-----BEGIN PUBLIC KEY-----
MFYwEAYHKoZIzj0CAQYFK4EEAAoDQgAE...
-----END PUBLIC KEY-----
Set Up IAM Permissions
Create a Service Account
kms-signer-sa).Grant KMS Permissions
- Role:
Cloud KMS CryptoKey Signer/Verifier(roles/cloudkms.signerVerifier)
Deploy a Cloud Run Signing Function
This function receives a digest, signs it with your KMS key, and returns the DER-encoded signature.Create a Cloud Run Function
- Name:
kms-signer-function - Region: Same region as your key ring (e.g.
us-west1) - Runtime: Node.js 18+
- Authentication: Configure based on your security requirements
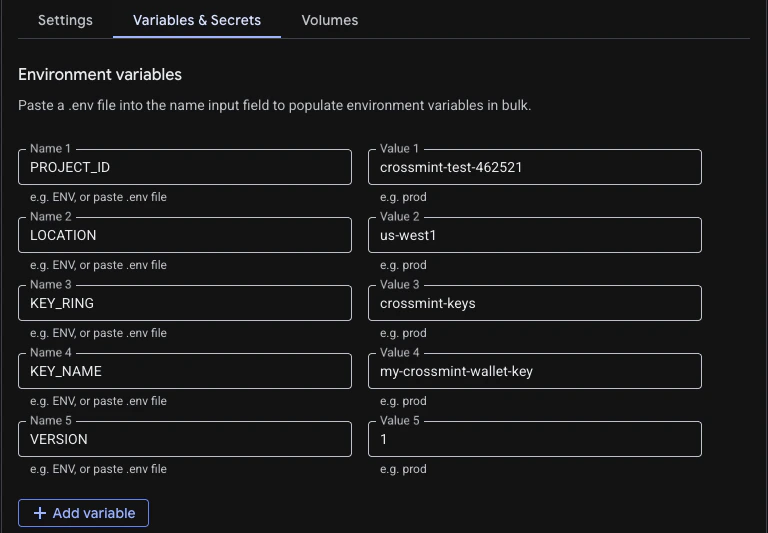
Set Environment Variables
projects/PROJECT_ID/locations/LOCATION/keyRings/KEY_RING/cryptoKeys/KEY_NAME/cryptoKeyVersions/VERSION.| Variable | Example Value |
|---|---|
PROJECT_ID | crossmint-test-462521 |
LOCATION | us-west1 |
KEY_RING | crossmint-keys |
KEY_NAME | my-crossmint-wallet-key |
VERSION | 1 |
Add the Function Code
signDigest, then paste the following code:const { KeyManagementServiceClient } = require("@google-cloud/kms");
const client = new KeyManagementServiceClient();
exports.signDigest = async (req, res) => {
try {
const { digest } = req.body;
const keyName = client.cryptoKeyVersionPath(
process.env.PROJECT_ID,
process.env.LOCATION,
process.env.KEY_RING,
process.env.KEY_NAME,
process.env.VERSION || "1"
);
const [signResponse] = await client.asymmetricSign({
name: keyName,
digest: { sha256: Buffer.from(digest, "hex") },
});
res.status(200).send({
derSignature: Buffer.from(signResponse.signature).toString("hex"),
});
} catch (error) {
res.status(500).send({ error: error.message });
}
};
@google-cloud/kms to your function’s package.json dependencies: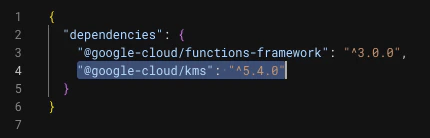
Deploy and Test
curl -X POST https://YOUR_FUNCTION_URL \
  -H "Content-Type: application/json" \
  -d '{"digest": "abcdef1234567890abcdef1234567890abcdef1234567890abcdef1234567890"}'
derSignature field.Create and Use the Crossmint Wallet
Now wire everything together — convert your KMS public key to an Ethereum address, create a Crossmint wallet, and sign transactions through your Cloud Run function.Install Dependencies
npm i @crossmint/wallets-sdk viem @peculiar/asn1-schema @peculiar/asn1-x509 buffer
yarn add @crossmint/wallets-sdk viem @peculiar/asn1-schema @peculiar/asn1-x509 buffer
pnpm add @crossmint/wallets-sdk viem @peculiar/asn1-schema @peculiar/asn1-x509 buffer
bun add @crossmint/wallets-sdk viem @peculiar/asn1-schema @peculiar/asn1-x509 buffer
Convert the KMS Public Key to an Ethereum Address
Google Cloud KMS returns public keys in PEM/DER format. This helper extracts the raw public key bytes and converts them to an Ethereum address usingviem.import { publicKeyToAddress } from "viem/accounts";
import { AsnParser } from "@peculiar/asn1-schema";
import { SubjectPublicKeyInfo } from "@peculiar/asn1-x509";
import { Buffer } from "buffer";
export const publicKeyPem = `-----BEGIN PUBLIC KEY-----
YOUR_PUBLIC_KEY_HERE
-----END PUBLIC KEY-----`;
export function kmsPemToEthAddress(pem: string): `0x${string}` {
const b64 = pem.replace(
/-----BEGIN PUBLIC KEY-----|-----END PUBLIC KEY-----|\s+/g,
""
);
const der = Uint8Array.from(Buffer.from(b64, "base64"));
const spki = AsnParser.parse(der, SubjectPublicKeyInfo);
const publicKeyHex = `0x${Buffer.from(
new Uint8Array(spki.subjectPublicKey)
).toString("hex")}` as `0x${string}`;
return publicKeyToAddress(publicKeyHex);
}
Build the KMS Signing Function
Cloud KMS returns DER-encoded signatures. Ethereum requiresr, s, v format with EIP-2 low-s normalization. This function handles the full conversion:import { hashMessage, recoverPublicKey } from "viem";
import { publicKeyToAddress } from "viem/accounts";
import { Buffer } from "buffer";
import { kmsPemToEthAddress, publicKeyPem } from "./kms-utils";
const KMS_SIGNER_URL = "https://YOUR_CLOUD_FUNCTION_URL";
const SECP256K1_N =
0xfffffffffffffffffffffffffffffffebaaedce6af48a03bbfd25e8cd0364141n;
const SECP256K1_HALF_N = SECP256K1_N / 2n;
function derToRS(derHex: string): { r: bigint; s: bigint } {
const bytes = Buffer.from(derHex, "hex");
let offset = 2; // skip 0x30 + length byte
offset++; // skip 0x02 tag for r
const rLen = bytes[offset++];
const r = BigInt("0x" + bytes.slice(offset, offset + rLen).toString("hex"));
offset += rLen;
offset++; // skip 0x02 tag for s
const sLen = bytes[offset++];
const s = BigInt("0x" + bytes.slice(offset, offset + sLen).toString("hex"));
return { r, s };
}
function bigintToHex(value: bigint): `0x${string}` {
return `0x${value.toString(16).padStart(64, "0")}`;
}
export async function signWithKms(message: `0x${string}`): Promise<`0x${string}`> {
const digest = hashMessage({ raw: message });
const response = await fetch(KMS_SIGNER_URL, {
method: "POST",
headers: { "Content-Type": "application/json" },
body: JSON.stringify({ digest: digest.slice(2) }),
});
if (!response.ok) {
throw new Error(`KMS signing failed: ${response.statusText}`);
}
const { derSignature } = await response.json();
let { r, s } = derToRS(derSignature);
// EIP-2 low-s normalization
if (s > SECP256K1_HALF_N) {
s = SECP256K1_N - s;
}
const rHex = bigintToHex(r);
const sHex = bigintToHex(s);
const expectedAddress = kmsPemToEthAddress(publicKeyPem);
// Recover v by trying both 27 and 28
for (const v of [27n, 28n]) {
const sig = `${rHex}${sHex.slice(2)}${
v === 27n ? "1b" : "1c"
}` as `0x${string}`;
const recovered = publicKeyToAddress(
await recoverPublicKey({ hash: digest, signature: sig })
);
if (recovered.toLowerCase() === expectedAddress.toLowerCase()) {
return sig;
}
}
throw new Error("Could not recover valid signature");
}
Create the Wallet
Use the KMS-derived Ethereum address as the wallet’s recovery method. The recovery method is used for wallet recovery and adding new signers — ideal for a server-held KMS key.import { CrossmintWallets, createCrossmint } from "@crossmint/wallets-sdk";
import { kmsPemToEthAddress, publicKeyPem } from "./kms-utils";
import { signWithKms } from "./kms-signer";
const crossmint = createCrossmint({
apiKey: "YOUR_CROSSMINT_SERVER_API_KEY",
});
export const crossmintWallets = CrossmintWallets.from(crossmint);
const wallet = await crossmintWallets.createWallet({
chain: "base-sepolia",
recoveryMethods: [
{
type: "external-wallet",
address: kmsPemToEthAddress(publicKeyPem),
onSign: async (message) => {
return signWithKms(message as `0x${string}`);
},
},
],
alias: "my-crossmint-wallet",
});
Use the Wallet
Once created, retrieve the wallet and use it to sign transactions. Here are a couple of examples:import { EVMWallet } from "@crossmint/wallets-sdk";
import { kmsPemToEthAddress, publicKeyPem } from "./kms-utils";
import { signWithKms } from "./kms-signer";
import { crossmintWallets } from "./create-wallet";
const wallet = await crossmintWallets.getWallet(
"evm:alias:my-crossmint-wallet",
{ chain: "base-sepolia" }
);
await wallet.useSigner({
type: "external-wallet",
address: kmsPemToEthAddress(publicKeyPem),
onSign: async (message) => {
return signWithKms(message as `0x${string}`);
},
});
// Example: Send tokens
await wallet.send("0xRecipientAddress", "usdxm", "1");
// Example: Send a raw EVM transaction
const evmWallet = EVMWallet.from(wallet);
await evmWallet.sendTransaction({
to: "0xRecipientAddress",
value: BigInt(0),
data: "0x",
});
Security Best Practices
- Restrict Cloud Run access: Use IAM authentication or VPC Service Controls to ensure only authorized services can call your signing function.
- Enable audit logs: Turn on Cloud KMS “Data Access” audit logs to track every signing operation.
- Principle of least privilege: Only grant the
signerVerifierrole — never grantadminorencrypterDecrypterroles to your signing service account. - Environment variables: Never hardcode your Crossmint API key or GCP credentials. Use environment variables or a secrets manager.
How It Works
- You create an asymmetric signing key inside AWS KMS — the private key never leaves AWS hardware security modules (HSMs).
- An AWS Lambda function sits in front of KMS and signs transaction digests on demand.
- The Crossmint SDK calls your Lambda function whenever the wallet needs to sign something.
- The signature is converted from AWS’s DER format to Ethereum’s
r, s, vformat, and the Crossmint SDK uses it to complete the transaction.
What You Will Build
- An asymmetric signing key in AWS KMS (secp256k1)
- An IAM role scoped to KMS signing operations
- A Lambda function that signs digests via KMS
- A Crossmint server wallet using your KMS key as its signer
Prerequisites
- An AWS account with appropriate permissions to create KMS keys, IAM roles, Lambda functions, and API Gateway resources
- A Crossmint server API key
- Node.js 18+
Required AWS IAM Permissions
Required AWS IAM Permissions
| Permission | Purpose |
|---|---|
kms:CreateKey | Create the KMS asymmetric key for signing |
iam:CreateRole | Create the IAM role for Lambda execution |
iam:PutRolePolicy | Attach inline policies to the IAM role |
iam:PutGroupPolicy | Configure group-level policies if needed |
ec2:DescribeVpcEndpoints | Configure VPC endpoints for private API access |
apigateway:UpdateRestApiPolicy | Update API Gateway resource policies |
Set Up AWS KMS
Access AWS KMS
Create a Customer Managed Key
Configure Key Settings
| Setting | Value |
|---|---|
| Key type | Asymmetric |
| Key usage | Sign and verify |
| Key spec | ECC_SECG_P256K1 |
ECC_SECG_P256K1 specification is the secp256k1 elliptic curve, which is the same curve used by Ethereum and other EVM-compatible blockchains for cryptographic operations.Name Your Key
my-crossmint-wallet-key.Set Permissions
Copy the Public Key
-----BEGIN PUBLIC KEY-----
MFYwEAYHKoZIzj0CAQYFK4EEAAoDQgAE...
-----END PUBLIC KEY-----
Set Up IAM Permissions
Next, create an IAM role that allows your Lambda function to call KMS for signing operations.Create a New Role
Configure Role Type
Skip Permission Policies
Name the Role
kms-signer-role.Add Inline Policy
Configure the Policy
{
    "Version": "2012-10-17",
    "Statement": [
        {
            "Effect": "Allow",
            "Action": ["kms:Sign", "kms:GetPublicKey"],
            "Resource": "arn:aws:kms:REGION:ACCOUNT_ID:key/KEY_ID"
        }
    ]
}
| Placeholder | Where to Find It |
|---|---|
REGION | Your AWS region (e.g., us-east-1, eu-north-1) |
ACCOUNT_ID | Click your profile icon in the top-right corner of AWS Console |
KEY_ID | Found on your KMS key’s dashboard page |
Save the Policy
kms.policy) and click “Create policy”.Deploy a Lambda Signing Function
Now create a Lambda function that will handle signing requests using your KMS key.Create the Function
kms-signer-function.Configure Execution Role
kms-signer-role).Set Environment Variables
KMS_KEY_ID and set it to your KMS key ID. You can find the key ID at the top of the KMS key’s dashboard page.
Add the Function Code
View Lambda Function Code
View Lambda Function Code
import { KMSClient, SignCommand } from '@aws-sdk/client-kms'

const kms = new KMSClient({})

const KEY_ID = process.env.KMS_KEY_ID
if (!KEY_ID) throw new Error('Missing env var KMS_KEY_ID')

// secp256k1 curve parameters
const SECP256K1_P = BigInt('0xFFFFFFFFFFFFFFFFFFFFFFFFFFFFFFFFFFFFFFFFFFFFFFFFFFFFFFFEFFFFFC2F')
const SECP256K1_N = BigInt('0xFFFFFFFFFFFFFFFFFFFFFFFFFFFFFFFEBAAEDCE6AF48A03BBFD25E8CD0364141')
const SECP256K1_HALF_N = SECP256K1_N / 2n
const SECP256K1_Gx = BigInt('0x79BE667EF9DCBBAC55A06295CE870B07029BFCDB2DCE28D959F2815B16F81798')
const SECP256K1_Gy = BigInt('0x483ADA7726A3C4655DA4FBFC0E1108A8FD17B448A68554199C47D08FFB10D4B8')

export const handler = async (event) => {
  const body = typeof event.body === 'string' ? JSON.parse(event.body) : (event.body ?? event)

  const digestInput = body.userOpHash ?? body.useropHash ?? body.hash ?? body.digest
  if (!digestInput) {
    return resp(400, {
      error: 'Missing userOpHash (0x..32 bytes) or digest (0x..32 bytes or base64 32 bytes)'
    })
  }

  const signerAddress = body.signerAddress
  if (!signerAddress || !signerAddress.startsWith('0x') || signerAddress.length !== 42) {
    return resp(400, {
      error: 'Missing or invalid signerAddress (must be 0x-prefixed 20-byte hex address)'
    })
  }

  const digestBytes = parse32ByteDigest(digestInput)
  if (!digestBytes) return resp(400, { error: 'Digest must be 32 bytes (hex 0x.. or base64)' })

  // Apply EIP-191 personal sign prefix before signing
  // This computes: keccak256("\x19Ethereum Signed Message:\n32" + digestBytes)
  const ethSignedHash = hashMessage(digestBytes)

  const out = await kms.send(
    new SignCommand({
      KeyId: KEY_ID,
      Message: ethSignedHash,
      MessageType: 'DIGEST',
      SigningAlgorithm: 'ECDSA_SHA_256'
    })
  )

  if (!out.Signature) return resp(500, { error: 'KMS did not return a signature' })

  let { r, s } = derToRS(Buffer.from(out.Signature))

  // Enforce low-s (EIP-2)
  let sBig = BigInt(s)
  let sFlipped = false
  if (sBig > SECP256K1_HALF_N) {
    sBig = SECP256K1_N - sBig
    s = toPaddedHex(sBig, 32)
    sFlipped = true
  }

  // Determine the correct recovery parameter by trying both and comparing addresses
  const rBig = BigInt(r)
  const hashBig = BigInt('0x' + Buffer.from(ethSignedHash).toString('hex'))

  let correctV = null
  const recoveredAddresses = []
  for (const recoveryParam of [0, 1]) {
    try {
      const recoveredPubKey = ecrecover(hashBig, rBig, sBig, recoveryParam)
      if (!recoveredPubKey) {
        recoveredAddresses.push({ v: recoveryParam + 27, error: 'recovery returned null' })
        continue
      }

      const recoveredAddress = pubKeyToAddress(recoveredPubKey)
      recoveredAddresses.push({ v: recoveryParam + 27, address: recoveredAddress })

      if (recoveredAddress.toLowerCase() === signerAddress.toLowerCase()) {
        correctV = recoveryParam + 27
        break
      }
    } catch (err) {
      recoveredAddresses.push({ v: recoveryParam + 27, error: err.message })
    }
  }

  if (correctV === null) {
    return resp(500, {
      error: 'Failed to determine correct signature recovery parameter. Verify signerAddress matches the KMS key.',
      debug: {
        expectedAddress: signerAddress,
        recoveredAddresses,
        r,
        s
      }
    })
  }

  const signature = hexConcat([r, s, toPaddedHex(BigInt(correctV), 1)])

  return {
    statusCode: 200,
    headers: { 'content-type': 'application/json' },
    body: JSON.stringify({ signature })
  }
}

function resp(statusCode, body) {
  return { statusCode, headers: { 'content-type': 'application/json' }, body: JSON.stringify(body) }
}

// EIP-191 personal sign: keccak256("\x19Ethereum Signed Message:\n" + len + message)
function hashMessage(messageBytes) {
  const prefix = Buffer.from(`\x19Ethereum Signed Message:\n${messageBytes.length}`, 'utf8')
  const prefixedMessage = Buffer.concat([prefix, messageBytes])
  return Buffer.from(keccak256(prefixedMessage))
}

function parse32ByteDigest(input) {
  if (typeof input !== 'string') return null
  if (input.startsWith('0x')) {
    try {
      const bytes = Buffer.from(input.slice(2), 'hex')
      return bytes.length === 32 ? bytes : null
    } catch {
      return null
    }
  }
  try {
    const bytes = Buffer.from(input, 'base64')
    return bytes.length === 32 ? bytes : null
  } catch {
    return null
  }
}

function derToRS(der) {
  let i = 0
  if (der[i++] !== 0x30) throw new Error('Invalid DER: expected SEQUENCE')
  const seq = readDerLen(der, i)
  i = seq.next
  if (der[i++] !== 0x02) throw new Error('Invalid DER: expected INTEGER (r)')
  const rLen = readDerLen(der, i)
  i = rLen.next
  const rBytes = der.slice(i, i + rLen.len)
  i += rLen.len
  if (der[i++] !== 0x02) throw new Error('Invalid DER: expected INTEGER (s)')
  const sLen = readDerLen(der, i)
  i = sLen.next
  const sBytes = der.slice(i, i + sLen.len)
  return { r: bytesToPaddedHex(stripLeadingZero(rBytes), 32), s: bytesToPaddedHex(stripLeadingZero(sBytes), 32) }
}

function readDerLen(buf, offset) {
  const first = buf[offset]
  if (first < 0x80) return { len: first, next: offset + 1 }
  const n = first & 0x7f
  let len = 0
  for (let j = 0; j < n; j++) len = (len << 8) | buf[offset + 1 + j]
  return { len, next: offset + 1 + n }
}

function stripLeadingZero(b) {
  return (b.length > 1 && b[0] === 0x00) ? b.slice(1) : b
}

function bytesToPaddedHex(b, size) {
  return '0x' + Buffer.from(b).toString('hex').padStart(size * 2, '0')
}

function toPaddedHex(n, size) {
  let hex = n.toString(16)
  if (hex.length > size * 2) hex = hex.slice(-size * 2)
  return '0x' + hex.padStart(size * 2, '0')
}

function hexConcat(parts) {
  return '0x' + parts.map((p) => (p.startsWith('0x') ? p.slice(2) : p)).join('')
}

// ============================================================================
// Pure JavaScript secp256k1 ecrecover implementation
// ============================================================================

// Modular arithmetic helpers
function mod(a, m) {
  const result = a % m
  return result >= 0n ? result : result + m
}

function modInverse(a, m) {
  a = mod(a, m) // Ensure a is positive before computing inverse
  if (a === 0n) throw new Error('No modular inverse for 0')
  let [old_r, r] = [a, m]
  let [old_s, s] = [1n, 0n]
  while (r !== 0n) {
    const q = old_r / r
    ;[old_r, r] = [r, old_r - q * r]
    ;[old_s, s] = [s, old_s - q * s]
  }
  return mod(old_s, m)
}

function modPow(base, exp, m) {
  let result = 1n
  base = mod(base, m)
  while (exp > 0n) {
    if (exp % 2n === 1n) result = mod(result * base, m)
    exp = exp / 2n
    base = mod(base * base, m)
  }
  return result
}

// Elliptic curve point operations (affine coordinates)
function pointAdd(p1, p2) {
  if (p1 === null) return p2
  if (p2 === null) return p1

  const [x1, y1] = p1
  const [x2, y2] = p2

  if (x1 === x2) {
    if (y1 !== y2) return null // point at infinity
    // Point doubling
    const s = mod(3n * x1 * x1 * modInverse(2n * y1, SECP256K1_P), SECP256K1_P)
    const x3 = mod(s * s - 2n * x1, SECP256K1_P)
    const y3 = mod(s * (x1 - x3) - y1, SECP256K1_P)
    return [x3, y3]
  }

  const s = mod((y2 - y1) * modInverse(x2 - x1, SECP256K1_P), SECP256K1_P)
  const x3 = mod(s * s - x1 - x2, SECP256K1_P)
  const y3 = mod(s * (x1 - x3) - y1, SECP256K1_P)
  return [x3, y3]
}

function pointMul(k, point) {
  let result = null
  let addend = point
  while (k > 0n) {
    if (k & 1n) result = pointAdd(result, addend)
    addend = pointAdd(addend, addend)
    k >>= 1n
  }
  return result
}

// Recover y-coordinate from x-coordinate on secp256k1
function recoverY(x, isOdd) {
  // y² = x³ + 7 (mod p)
  const ySquared = mod(modPow(x, 3n, SECP256K1_P) + 7n, SECP256K1_P)
  // y = ySquared^((p+1)/4) mod p (works because p ≡ 3 mod 4)
  const y = modPow(ySquared, (SECP256K1_P + 1n) / 4n, SECP256K1_P)
  // Verify
  if (mod(y * y, SECP256K1_P) !== ySquared) return null
  // Return the y with correct parity
  const yIsOdd = (y & 1n) === 1n
  return yIsOdd === isOdd ? y : mod(-y, SECP256K1_P)
}

// ecrecover: recover public key from signature
function ecrecover(msgHash, r, s, recoveryParam) {
  // Recover the point R from r and recoveryParam
  const isOdd = (recoveryParam & 1) === 1
  const x = r
  const y = recoverY(x, isOdd)
  if (y === null) return null

  const R = [x, y]
  const G = [SECP256K1_Gx, SECP256K1_Gy]

  // Public key P = r^(-1) * (s*R - e*G)
  const rInv = modInverse(r, SECP256K1_N)
  const u1 = mod(-msgHash * rInv, SECP256K1_N)
  const u2 = mod(s * rInv, SECP256K1_N)

  const point1 = pointMul(u1, G)
  const point2 = pointMul(u2, R)
  const pubKeyPoint = pointAdd(point1, point2)

  if (pubKeyPoint === null) return null

  // Return uncompressed public key (65 bytes: 0x04 || x || y)
  const xHex = pubKeyPoint[0].toString(16).padStart(64, '0')
  const yHex = pubKeyPoint[1].toString(16).padStart(64, '0')
  return Buffer.from('04' + xHex + yHex, 'hex')
}

function pubKeyToAddress(pubKey) {
  // Skip the 0x04 prefix and hash the 64 bytes
  const hash = keccak256(pubKey.slice(1))
  return '0x' + Buffer.from(hash.slice(12)).toString('hex')
}

// ============================================================================
// Pure JavaScript Keccak-256 implementation (no external dependencies)
// ============================================================================
const KECCAK_ROUNDS = 24
const ROTC = [1,3,6,10,15,21,28,36,45,55,2,14,27,41,56,8,25,43,62,18,39,61,20,44]
const PILN = [10,7,11,17,18,3,5,16,8,21,24,4,15,23,19,13,12,2,20,14,22,9,6,1]
const RNDC = [
  0x0000000000000001n, 0x0000000000008082n, 0x800000000000808an, 0x8000000080008000n,
  0x000000000000808bn, 0x0000000080000001n, 0x8000000080008081n, 0x8000000000008009n,
  0x000000000000008an, 0x0000000000000088n, 0x0000000080008009n, 0x000000008000000an,
  0x000000008000808bn, 0x800000000000008bn, 0x8000000000008089n, 0x8000000000008003n,
  0x8000000000008002n, 0x8000000000000080n, 0x000000000000800an, 0x800000008000000an,
  0x8000000080008081n, 0x8000000000008080n, 0x0000000080000001n, 0x8000000080008008n
]

function rotl64(x, n) {
  n = BigInt(n)
  return ((x << n) | (x >> (64n - n))) & 0xffffffffffffffffn
}

function keccakF(state) {
  for (let round = 0; round < KECCAK_ROUNDS; round++) {
    // Theta
    const C = new Array(5)
    for (let x = 0; x < 5; x++) {
      C[x] = state[x] ^ state[x + 5] ^ state[x + 10] ^ state[x + 15] ^ state[x + 20]
    }
    const D = new Array(5)
    for (let x = 0; x < 5; x++) {
      D[x] = C[(x + 4) % 5] ^ rotl64(C[(x + 1) % 5], 1)
    }
    for (let x = 0; x < 5; x++) {
      for (let y = 0; y < 5; y++) {
        state[x + y * 5] ^= D[x]
      }
    }

    // Rho and Pi
    let t = state[1]
    for (let i = 0; i < 24; i++) {
      const j = PILN[i]
      const temp = state[j]
      state[j] = rotl64(t, ROTC[i])
      t = temp
    }

    // Chi
    for (let y = 0; y < 5; y++) {
      const row = [state[y * 5], state[y * 5 + 1], state[y * 5 + 2], state[y * 5 + 3], state[y * 5 + 4]]
      for (let x = 0; x < 5; x++) {
        state[y * 5 + x] = row[x] ^ ((~row[(x + 1) % 5]) & row[(x + 2) % 5])
      }
    }

    // Iota
    state[0] ^= RNDC[round]
  }
}

function keccak256(input) {
  const inputBytes = Buffer.isBuffer(input) ? input : Buffer.from(input)
  const rate = 136 // (1600 - 256 * 2) / 8 for keccak-256
  const state = new Array(25).fill(0n)

  // Pad the input: append 0x01, then zeros, then 0x80
  const padLen = rate - (inputBytes.length % rate)
  const padded = Buffer.alloc(inputBytes.length + padLen)
  inputBytes.copy(padded)
  padded[inputBytes.length] = 0x01
  padded[padded.length - 1] |= 0x80

  // Absorb
  for (let offset = 0; offset < padded.length; offset += rate) {
    for (let i = 0; i < rate / 8; i++) {
      const lane = padded.readBigUInt64LE(offset + i * 8)
      state[i] ^= lane
    }
    keccakF(state)
  }

  // Squeeze (just 32 bytes for keccak-256)
  const output = Buffer.alloc(32)
  for (let i = 0; i < 4; i++) {
    output.writeBigUInt64LE(state[i], i * 8)
  }
  return output
}
Deploy the Function
Expose Function as HTTP Endpoint
Open your Lambda function
Create Function URL
Set Auth Type
Copy the URL
KMS_SIGNER_URL in your application code.NONE is publicly accessible. For production, use AWS_IAM auth
or put the Lambda behind an API Gateway with IAM authorization. See the advanced setup below.Advanced: Create an API Gateway with IAM Auth
Advanced: Create an API Gateway with IAM Auth
awscurl).Create the API
Configure API Settings
KMS Sign API) and select a security policy that meets your requirements.Create a Method
| Setting | Value |
|---|---|
| Method type | POST |
| Lambda function | Select the Lambda function you created |
| Authorization (In Method Request Settings) | AWS IAM |
Create a Stage
prod).Deploy the API
Add Resource Policy
{
    "Version": "2012-10-17",
    "Statement": [
        {
            "Sid": "AllowAnyoneInThisAccount",
            "Effect": "Allow",
            "Principal": "*",
            "Action": "execute-api:Invoke",
            "Resource": "arn:aws:execute-api:REGION:ACCOUNT_ID:API_ID/*/POST/",
            "Condition": {
                "StringEquals": {
                    "aws:PrincipalAccount": "ACCOUNT_ID"
                }
            }
        }
    ]
}
| Placeholder | Where to Find It |
|---|---|
REGION | Your AWS region (e.g., us-east-1, eu-north-1) |
ACCOUNT_ID | Click your profile icon in the top-right corner of AWS Console |
API_ID | Found in the API Gateway console URL or in the API’s ARN |
Save the Invoke URL
Grant User Group Access to API Gateway
- Search for IAM in the AWS Console and navigate to User groups in the left panel.
- Select the user group you want to grant access to (or create a new one).
- Go to the Permissions tab.
- Click Add permissions and select Create inline policy.
- Select the JSON tab in the policy editor.
- Paste the following policy:
{
    "Version": "2012-10-17",
    "Statement": [
        {
            "Effect": "Allow",
            "Action": "execute-api:Invoke",
            "Resource": "arn:aws:execute-api:REGION:ACCOUNT_ID:API_ID/STAGE/POST/"
        }
    ]
}
| Placeholder | Where to Find It |
|---|---|
REGION | Your AWS region (e.g., us-east-1, eu-north-1) |
ACCOUNT_ID | Click your profile icon in the top-right corner of AWS Console |
API_ID | Found in the API Gateway console URL or in the API’s ARN |
STAGE | The stage name you created (e.g., prod) |
- Click Next, give the policy a name (e.g.,
api-gateway-invoke-policy), and click Create policy.
Test Using AWS CLI
Test Using AWS CLI
Open Security Credentials
Create Access Key
Select Use Case
Copy Access Keys
Run AWS Configure
aws configure to set up your AWS credentials:aws configure
Enter Access Key ID
Enter Secret Access Key
Enter Default Region
us-east-1, eu-north-1).Set Output Format
json, yaml, text, or table.Your credentials will be stored in ~/.aws/credentials and your configuration in ~/.aws/config.Install awscurl
awscurl to make signed requests to your API:pip install awscurl
Generate Signature
awscurl --service execute-api --region YOUR_REGION \
    -X POST "https://YOUR_API_ID.execute-api.YOUR_REGION.amazonaws.com/prod/" \
    -d '{"digest":"BASE64_ENCODED_MESSAGE_HASH", "signerAddress":"0xYOUR_KMS_SIGNER_ADDRESS"}'
| Placeholder | Description |
|---|---|
YOUR_REGION | Your AWS region (e.g., us-east-1, eu-north-1) |
YOUR_API_ID | Found in the API Gateway console URL or ARN (e.g., if ARN is arn:aws:execute-api:eu-north-1:257027486036:bho48fe8dl/*/POST/, then API_ID is bho48fe8dl) |
BASE64_ENCODED_MESSAGE_HASH | The base64-encoded message hash returned from wallet APIs |
0xYOUR_KMS_SIGNER_ADDRESS | The Ethereum address derived from your KMS public key (from step 3) |
Create and Use the Crossmint Wallet
Now wire everything together — convert your KMS public key to an Ethereum address, create a Crossmint wallet, and sign transactions through your Lambda function.Install Dependencies
npm i @crossmint/wallets-sdk viem @peculiar/asn1-schema @peculiar/asn1-x509 buffer
yarn add @crossmint/wallets-sdk viem @peculiar/asn1-schema @peculiar/asn1-x509 buffer
pnpm add @crossmint/wallets-sdk viem @peculiar/asn1-schema @peculiar/asn1-x509 buffer
bun add @crossmint/wallets-sdk viem @peculiar/asn1-schema @peculiar/asn1-x509 buffer
Convert the KMS Public Key to an Ethereum Address
AWS KMS provides the public key in PEM format. You need to convert it to an Ethereum address. The code below handles this conversion by parsing the PEM-encoded public key and deriving the corresponding Ethereum address.publicKeyPem placeholder with the public key you copied from AWS KMS in the previous step.import { publicKeyToAddress } from "viem/accounts";
import { AsnParser } from "@peculiar/asn1-schema";
import { SubjectPublicKeyInfo } from "@peculiar/asn1-x509";
import { Buffer } from "buffer";
// Paste the public key from your AWS KMS key here
export const publicKeyPem = `-----BEGIN PUBLIC KEY-----
YOUR_KMS_PUBLIC_KEY_HERE
-----END PUBLIC KEY-----
`;
function pemToDer(pem: string): Uint8Array {
const b64 = pem
.replace(/-----BEGIN PUBLIC KEY-----/g, "")
.replace(/-----END PUBLIC KEY-----/g, "")
.replace(/\s+/g, "");
return Uint8Array.from(Buffer.from(b64, "base64"));
}
export function kmsPemToEthAddress(pem: string): `0x${string}` {
const der = pemToDer(pem);
// Parse SPKI and extract the BIT STRING (the actual EC point bytes)
const spki = AsnParser.parse(der, SubjectPublicKeyInfo);
const uncompressed = new Uint8Array(spki.subjectPublicKey); // 65 bytes: 04 || X || Y
if (uncompressed.length !== 65 || uncompressed[0] !== 0x04) {
throw new Error("Expected uncompressed secp256k1 public key (65 bytes starting with 0x04).");
}
const publicKeyHex = `0x${Buffer.from(uncompressed).toString("hex")}` as `0x${string}`;
return publicKeyToAddress(publicKeyHex);
}
@peculiar/asn1-schema and @peculiar/asn1-x509 packages were already installed in the “Install Dependencies” step above.Build the KMS Signing Function
The Lambda function from the previous step handles DER-to-Ethereum signature conversion and EIP-2 low-s normalization. This client-side function calls your Lambda and returns the resulting signature:fetch call, which works with Lambda Function URLs (auth type NONE). If you set up API Gateway with IAM auth instead, you will need to sign requests with AWS SigV4 — use awscurl for testing (see the “Test Using AWS CLI” section above).import { kmsPemToEthAddress, publicKeyPem } from "./kms-utils";
const KMS_SIGNER_URL = "https://YOUR_LAMBDA_FUNCTION_URL";
export async function signWithKms(message: `0x${string}`): Promise<`0x${string}`> {
const expectedAddress = kmsPemToEthAddress(publicKeyPem);
const response = await fetch(KMS_SIGNER_URL, {
method: "POST",
headers: { "Content-Type": "application/json" },
body: JSON.stringify({
hash: message,
signerAddress: expectedAddress,
}),
});
if (!response.ok) {
throw new Error(`KMS signing failed: ${response.statusText}`);
}
const { signature } = await response.json();
return signature as `0x${string}`;
}
Create the Wallet
Use the KMS-derived Ethereum address as the wallet’s recovery method. The recovery method is used for wallet recovery and adding new signers — ideal for a server-held KMS key.import { CrossmintWallets, createCrossmint } from "@crossmint/wallets-sdk";
import { kmsPemToEthAddress, publicKeyPem } from "./kms-utils";
import { signWithKms } from "./kms-signer";
const crossmint = createCrossmint({
apiKey: "YOUR_CROSSMINT_SERVER_API_KEY",
});
export const crossmintWallets = CrossmintWallets.from(crossmint);
const wallet = await crossmintWallets.createWallet({
chain: "base-sepolia",
recoveryMethods: [
{
type: "external-wallet",
address: kmsPemToEthAddress(publicKeyPem),
onSign: async (message) => {
return signWithKms(message as `0x${string}`);
},
},
],
alias: "my-crossmint-wallet",
});
Use the Wallet
Once created, retrieve the wallet and use it to sign transactions. Here are a couple of examples:import { EVMWallet } from "@crossmint/wallets-sdk";
import { kmsPemToEthAddress, publicKeyPem } from "./kms-utils";
import { signWithKms } from "./kms-signer";
import { crossmintWallets } from "./create-wallet";
const wallet = await crossmintWallets.getWallet(
"evm:alias:my-crossmint-wallet",
{ chain: "base-sepolia" }
);
await wallet.useSigner({
type: "external-wallet",
address: kmsPemToEthAddress(publicKeyPem),
onSign: async (message) => {
return signWithKms(message as `0x${string}`);
},
});
// Example: Send tokens
await wallet.send("0xRecipientAddress", "usdxm", "1");
// Example: Send a raw EVM transaction
const evmWallet = EVMWallet.from(wallet);
await evmWallet.sendTransaction({
to: "0xRecipientAddress",
value: BigInt(0),
data: "0x",
});
Security Best Practices
- Restrict Lambda access: Use IAM authentication or VPC endpoints to ensure only authorized services can call your signing function.
- Enable audit logs: Turn on AWS CloudTrail to log all KMS and Lambda operations.
- Principle of least privilege: Only grant
kms:Signandkms:GetPublicKey— never grant broader KMS permissions to your signing role. - Environment variables: Never hardcode your Crossmint API key or AWS credentials. Use environment variables or AWS Secrets Manager.