- Confirm Offramp eligibility
- Save the user’s payout method
- Set up the wallet the user pays from
- Create an Offramp order and read its deposit instructions
- Broadcast the deposit and track the order to completion
Prerequisites
- A server-side API key with the
ordersandpayment-methodsscopes (Crossmint console). - A user KYC-verified for Offramp. To verify a user, follow Import User KYC Data or the Identity quickstart. This quickstart uses
userId:<USER_ID>in examples, but the API accepts any supporteduserLocator. - USDC to cash out. On staging, get testnet USDC from the Circle faucet.
- Native gas tokens in the sender wallet to broadcast the deposit transaction (e.g., ETH on Base, SOL on Solana). This does not apply if the wallet sponsors gas.
Offramp uses Crossmint’s user KYC API. Contact sales to enable it for your project.
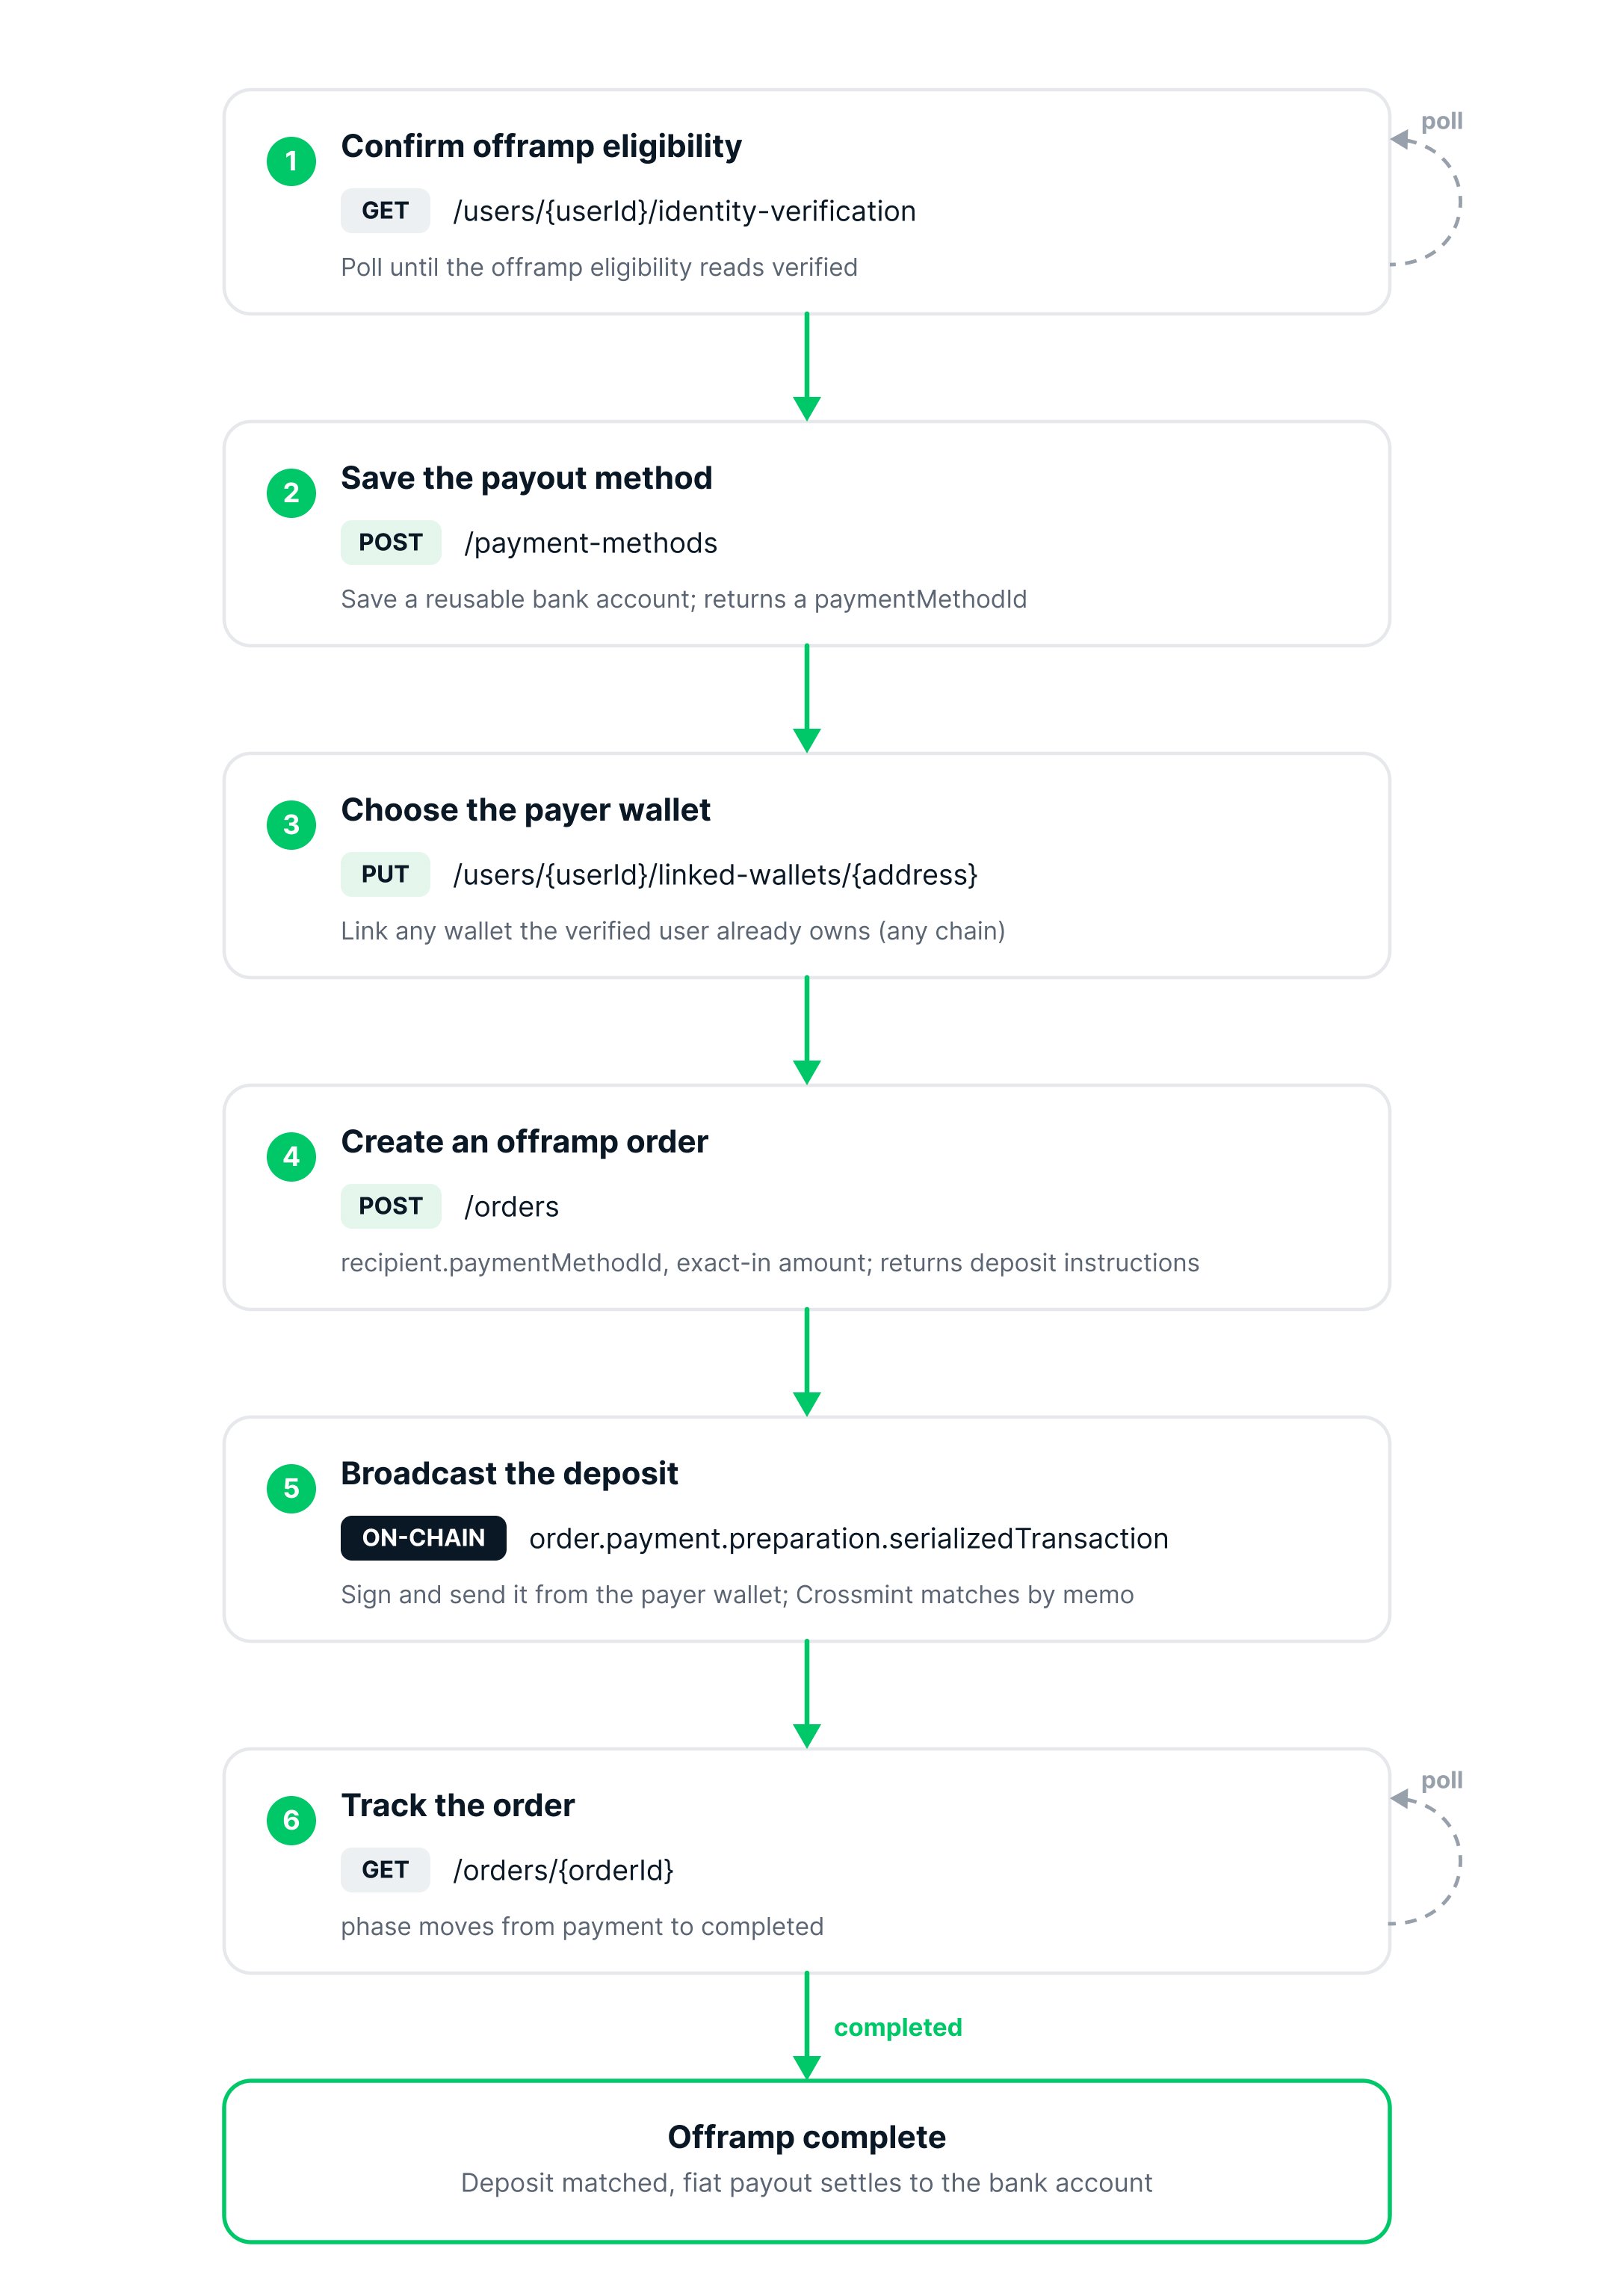
1
Confirm Offramp eligibility
Before creating an order, confirm that the user is verified for Offramp. Verification is asynchronous. Poll the user’s status with the Get Identity Verification endpoint until the
offramp eligibility reads verified:<USER_LOCATOR> is the Crossmint user locator for the verified user, for example userId:<USER_ID> or email:<EMAIL>. See the Get Identity Verification API reference for all supported locator formats.Example response
Example response
2
Save the user's payout method
Save the user’s payout destination as a reusable payment method. The example below saves a US bank account. Sensitive fields are saved securely.See the Create Payment Method API reference for the full request schema and supported payment method types.The response returns the saved payment method. Banks expose a masked
For listing, updating, and removing saved accounts, see Collect Bank Accounts.
accountSuffix (not last4). Save the paymentMethodId for the order step.Example response
Example response
3
Set up the payer wallet
Choose the wallet the user will send USDC from. The payer wallet must belong to the same verified user who owns the payout method.
- Crossmint wallet
- External wallet
Create a wallet owned by the verified user, with a
server signer so your backend can sign. Ownership links the wallet to the user, so there is no separate linking step, and deposits are gasless.ownerties the wallet to the verified user via their locator (e.g.,userId:<USER_ID>). This ownership means no separate linking step is needed.recoverysets aserversigner from yourCROSSMINT_SIGNER_SECRET, a secret you generate and keep on your server (the SDK derives the signing key from it locally). See Server Signer to create one.aliasis an optional label that makes the call idempotent, so re-running it with the same owner and alias returns the same wallet.
wallet.address with USDC and use it as the payer. No native gas is needed.4
Create an offramp order
Create the order with the amount of USDC to cash out (The order comes back in the
exact-in), the chain you will pay from, and the saved bank account as the recipient. Use the payer wallet from the previous step as payerAddress.payment phase. Its deposit instructions live under order.payment.preparation: a ready to broadcast serializedTransaction (a USDC transfer that already carries the matching memo in its calldata) and the same memo in transactionParameters.memo. Keep the order.orderId.To pin a specific payout rail, pass
recipient.rail (for example, "rail": "rtp") alongside paymentMethodId. The value must be one of the payment method’s bankAccount.rails.supported entries, or the order fails with a rail-not-supported error whose message includes the current status and supported list. Omit it to use the account’s default rail. Once the order routes, it snapshots the chosen rail on lineItems[].delivery.rail, which never changes afterward. See Payment Schemes for the current rail catalog.Example response (201)
Example response (201)
5
Broadcast the deposit
The order’s
payment.preparation.serializedTransaction is a prepared USDC transfer that already carries the order’s memo in its calldata. Sign and broadcast it from the payer wallet. Crossmint matches the deposit to the order by that memo automatically, so no further call is needed.- Crossmint wallet
- External wallet
Sign and send it from the wallet you created, using its See Send a Transaction for signer setup and other platforms.
server signer (a gasless transaction):6
Track the order
Poll the order until the payout completes, or subscribe to webhooks (see Manage Orders).
On staging the payout is simulated. To pay out to a bank in production, see Launch in Production.
GET returns the order flat at the top level (no order wrapper and no clientSecret, unlike the create response). Watch phase, which moves from payment to completed, along with payment.status and lineItems[0].delivery.status. When it completes, payment.received is populated with the matched on-chain transaction.Example response (completed)
Example response (completed)
Troubleshooting
Enable KYC for your project
Enable KYC for your project
Offramp’s KYC endpoints are turned on per project. Contact sales to enable KYC for yours. The response
project not configured to support the users KYC endpoints is the signal to reach out.Use a userId locator
Use a userId locator
The user and KYC endpoints expect a
userId: locator, for example userId:alice-123. The email: and other locator formats apply to Crossmint auth wallets, so use userId: for these endpoints.Wait for verification before ordering
Wait for verification before ordering
Verification is asynchronous. Poll
GET /users/{userId}/identity-verification until the offramp eligibility reads verified, then create the order.Set the Crossmint wallet owner to the verified user
Set the Crossmint wallet owner to the verified user
Create the payer wallet with
owner: "userId:<the verified user>". With no owner it is company-owned, which the order does not accept. A wallet’s owner is set once at creation.The deposit matches automatically
The deposit matches automatically
After you broadcast the prepared transaction, Crossmint matches it to the order by its memo, so the deposit is already assigned. You do not need to call
POST /orders/{orderId}/payment.Rail Not Supported
Rail Not Supported
If
recipient.rail is not one of the payment method’s bankAccount.rails.supported values, order creation fails with a rail-not-supported error. The error message text includes the account’s current rail status and supported list; refetch the payment method to read those values as structured fields.Next steps
Manage Orders
Status, webhooks, and failures
How It Works
The end-to-end offramp flow