

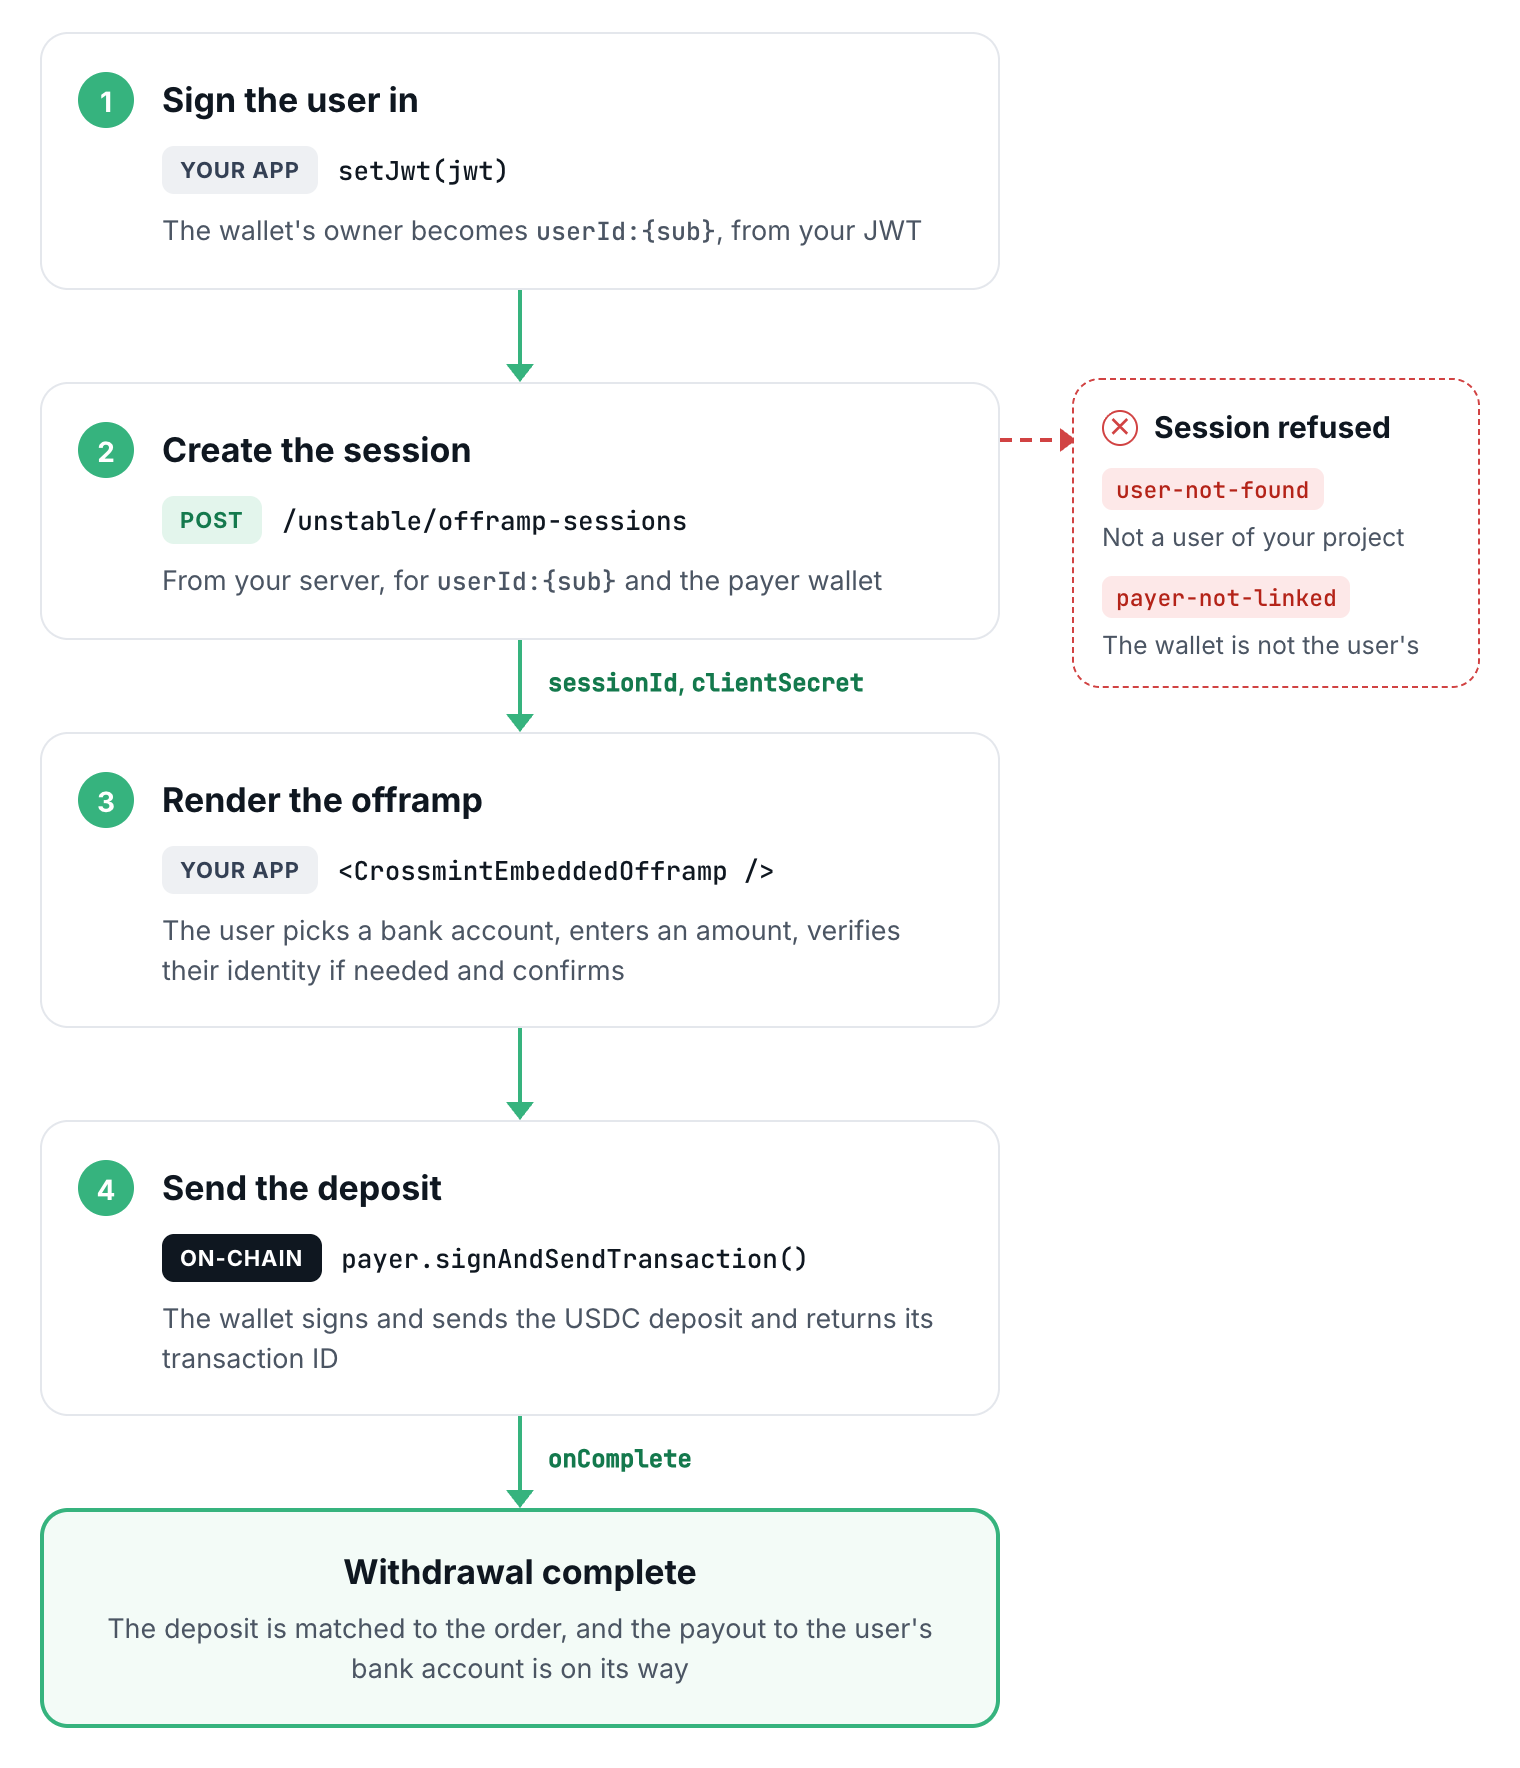
CrossmintEmbeddedOfframp component and run a withdrawal in the Staging environment. You will:
- Create an offramp session on your server for the user and the wallet they withdraw from
- Render
CrossmintEmbeddedOfframpwith the session and the user’s Crossmint wallet - Handle the component’s events
- Test a withdrawal on staging
Prerequisites
- Server: one server endpoint that creates the session, such as the Next.js server action in this guide.
- API keys: a server-side API key with the
orders.createandpayment-methods.createscopes, and a client-side API key for the component, both from the staging console. - Project setup: KYC configured for your project and, for production, Offramp and bank account payment methods enabled on it. Crossmint sets these up per project; contact Crossmint to enable them. You can test the embedded offramp on staging before they are enabled for production.
- Crossmint wallet: an EVM or Solana wallet owned by
userId:<USER_ID>, where the user ID is thesubof your JWT. Set up your authentication and the Crossmint providers as in Use Your Own Auth Provider, withbase-sepoliaas the chain. The session takes onlyuserId:locators, so email and phone locators do not work. - USDC: testnet USDC in the wallet, from the Circle faucet.
.env.local. Pass the client-side key to CrossmintProvider as apiKey={process.env.NEXT_PUBLIC_CROSSMINT_API_KEY}:
.env.local
Create the session on your server
A session lets one user make one withdrawal from one wallet. Your server makes one call, Create Offramp Session, and the component runs every other step with Crossmint: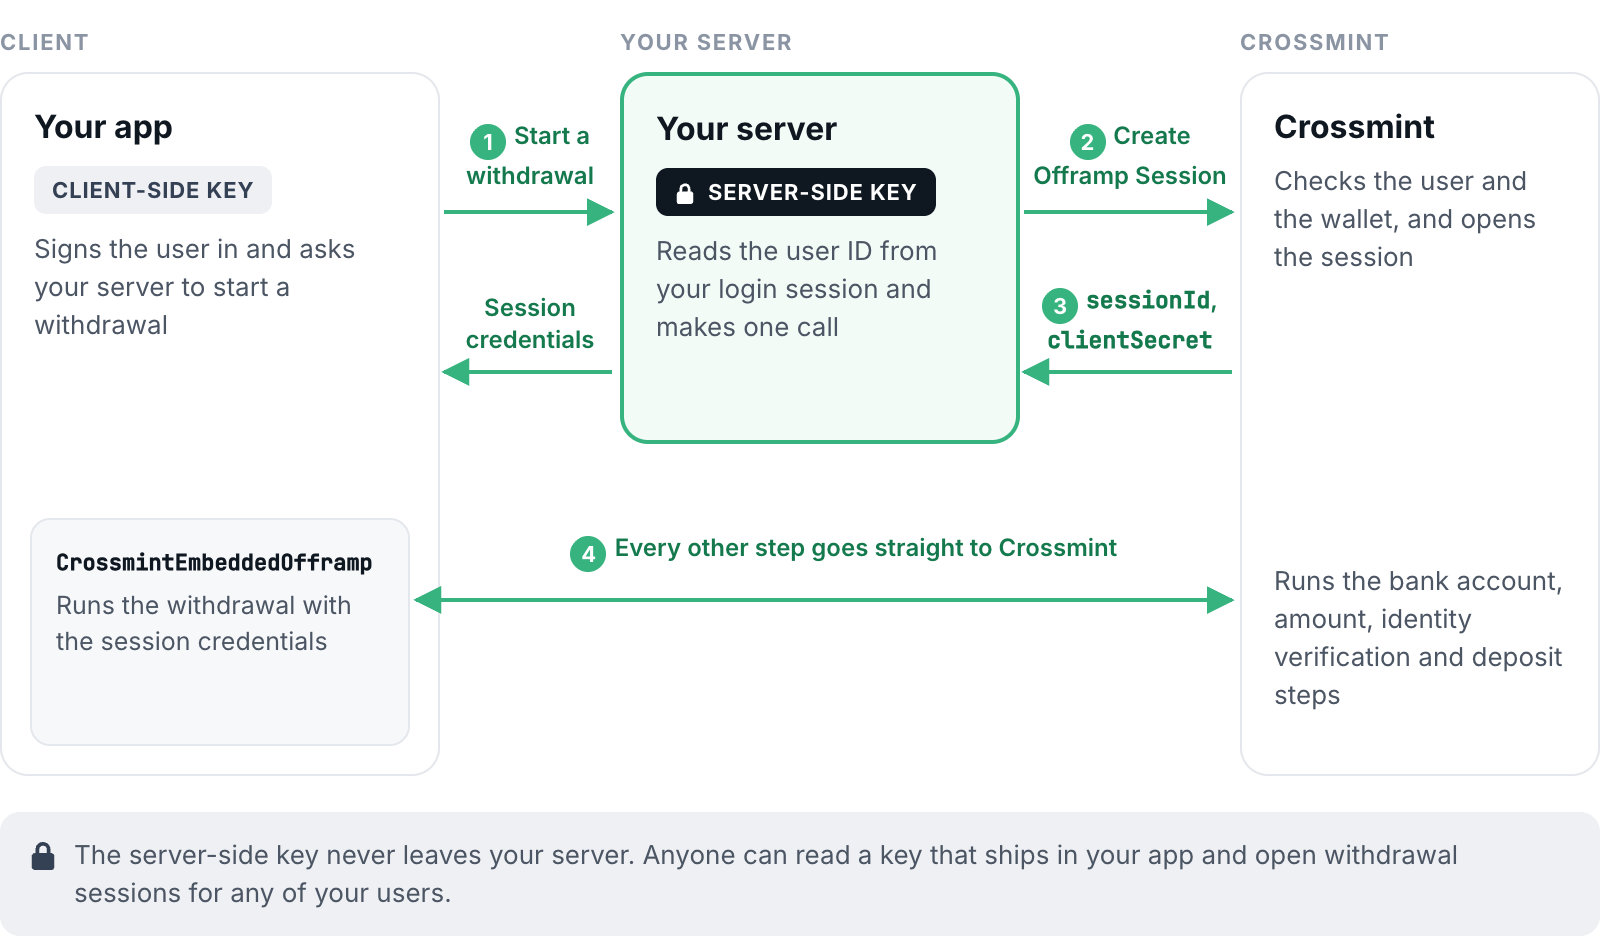
 Make the call from a server action. Anyone can read a key that ships to the browser, and with your server API key they could open withdrawal sessions for any of your users:
app/actions/createOfframpSession.ts
userLocatoris the user who withdraws, asuserId:<USER_ID>.payeris the wallet the deposit is sent from: itsaddress, and itschain(base,base-sepolia,polygon,polygon-amoyorsolana). It must be owned by or linked to the user.receiptEmailis where the withdrawal receipt is sent.
sessionId and clientSecret, which the component takes as its credentials, and expiresAt, when the session stops accepting new withdrawals (one hour after it is created). The component keeps showing the withdrawal's status for 24 hours. Calling the endpoint again for the same user and wallet returns the same open session until it is used or expires, and that session keeps the receiptEmail it was created with: the one in the new request is ignored.Example response (201)
Example response (201)
Render the offramp
Create a client component that creates the session and renders Render The component takes the width of its container. It is at least 650px tall plus padding, and grows when a screen needs more. To give it a fixed area instead, pass
CrossmintEmbeddedOfframp. createCrossmintWalletSigner turns the user’s Crossmint wallet into the payer that signs and sends the deposit:app/components/Withdraw.tsx
<Withdraw /> inside the Crossmint providers, with the user ID from your JWT and the user’s email:app/page.tsx
fill and give the container a definite height. See Sizing.Handle the events
The component shows its own screens for every step and every error, so the events are for your app's state and your logs:
onCompletefires with theorderIdand the deposit'stxIdonce the deposit is confirmed and the payout to the bank is on its way. It can fire again for the same order when the user reopens a completed withdrawal, so dedupe byorderId. The payout can still fail afterwards, so confirm the payout on your server.onCancelfires when the user closes the flow: Continue on the Withdrawal sent screen, Close on a failure screen, or Cancel when the order's bank account cannot be loaded. Unmount the component there. WithoutonCancel, those buttons do nothing. Closing the view while the deposit is confirming does not stop the deposit or the payout. Keep the latestorderIdfromonStatusChangeand follow it with Manage Orders or webhooks.onErrorreports areason, whether it isretriable, and amessagefor your logs. Whenretriableisfalse, the session cannot continue, so unmount the component. When the component shows a failure screen, its Close button callsonCancel. Forinvalid-credentials, create a new session to start over.onStatusChangereports each step of the flow with the currentorderId. TheorderIdcan change within one withdrawal, for example after identity verification or when the user takes a new rate, so keep the latest one. Thefailedstatus always ends the session, whateverretriablesays.
onCancel. No other screen has a Cancel button, so give the user your own way to close the component, like the Close button in the example above.Handle Offramp Events and Errors lists every status and error reason.Test on staging
- Fund the wallet with testnet USDC from the Circle faucet.
- Click Withdraw to bank, add a US bank account, and enter an amount. Use a bank account number that is unique to your integration.
- If the user is not verified yet, verify their identity when the component asks.
- Review the quote and confirm with Hold to confirm. The wallet signs and sends the deposit, and the status moves through
confirming-deposittocompleted, whenonCompletefires.
Use an External Wallet
To withdraw from a wallet that Crossmint did not create, link it to the user with Link External Wallet to User before you create the session, and pass your ownpayer. The component calls its signAndSendTransaction with the deposit to send:
serializedTransaction: a serialized transaction on EVM chains, or a base58 legacy transaction withfeePayerandrecentBlockhashset on Solana.chainandpayerAddress: the chain and wallet the deposit was prepared for. Do not send from a wallet that does not match: check it before you render the component. See Refuse a mismatched wallet.
OfframpSignatureRejectedError only when the user declines, so the component can offer the withdrawal again with a new rate:
payer.ts
wallet-ownership-required error. Link the wallet again with an ownership proof, then create a new session. For Solana deposits, see Offramp Orders on Solana.
Troubleshooting
The session request fails
The session request fails
Create Offramp Session returns a
code that names the problem:invalid-user-locator(400): the locator is notuserId:<USER_ID>.chain-not-supported(400): the chain is not supported, or the address is not valid on it.payer-not-linked(400): the wallet is not owned by or linked to this user.user-not-found(404): no user with this locator exists in your project. Create the session for the user ID (sub) in your own JWT.kyc-not-configured(403): KYC is not configured for your project. Contact Crossmint to set it up.addon-required(403): Offramp or bank account payment methods are not enabled for your production project. Contact Crossmint to enable it.- No
code(403): the API key is missing or invalid, is not a server key, or lacks theorders.createorpayment-methods.createscope. Create the session from your backend with a server API key that has both scopes. Themessagenames the missing scopes. - No
code(429): your project sent too many requests in a minute. Wait and retry.
Cancel, Continue or Close does nothing
Cancel, Continue or Close does nothing
Those buttons call
onCancel. Pass an onCancel handler that closes the component.The session has expired
The session has expired
A session accepts new withdrawals for one hour after it is created. A withdrawal whose deposit was never recorded also ends on this screen when the session's 24-hour status window closes. Create a new session and pass its credentials to the component.
Launching in Production
- Ask Crossmint to enable Offramp and bank account payment methods for your production project (contact Crossmint).
- Create production API keys with the same scopes in the production console, and replace your staging keys.
- Create sessions at
https://www.crossmint.com/api/unstable/offramp-sessions. - Follow Launch in Production for the remaining go-live steps.
Learn More
React SDK Reference
Props and types of
CrossmintEmbeddedOfframpHandle Offramp Events and Errors
What each status and error reason means